A complete walkthrough for migrating tasks from Jira into VibeOps — covering single tasks, epics, and stories with subtasks, using XML export and the built-in import flow.
Export from Jira
Import into VibeOps
Phase 1
Exporting Tasks from Jira
Jira supports XML export natively. The method you use depends on whether the item has subtasks or child tasks. Use the direct export for standalone tasks and JQL search for epics, stories, or anything with children.
Single Task Export
Use this method when the task has no subtasks and you only need to export a single item.
1
Open the Jira task you want to export.
2
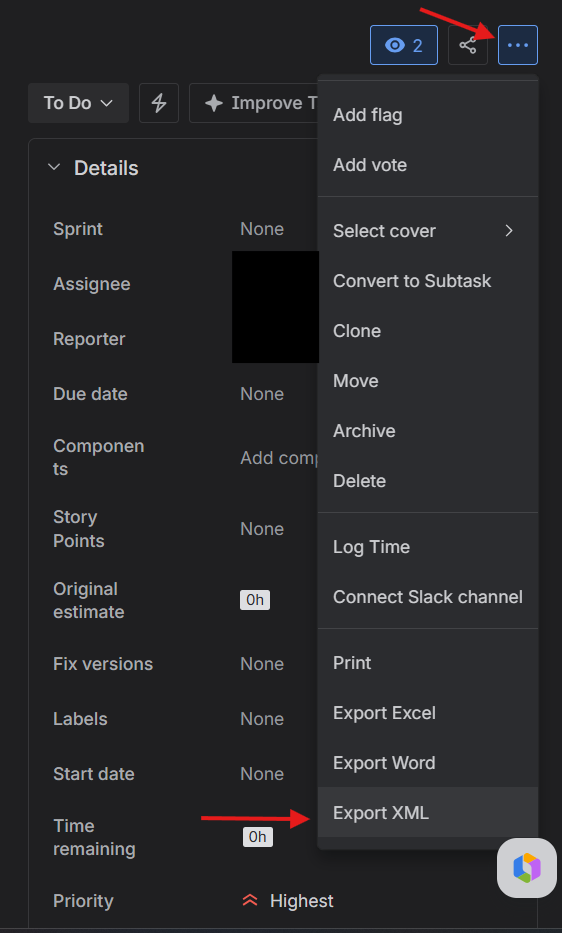
Click the three-dot menu (⋯) in the top-right corner of the task.
The menu icon is located in the header area next to the task title.
3
Select "Export XML" from the dropdown menu.
4
Save the downloaded .xml file to your computer.
Single task only
This export method captures only the top-level task. If the task has subtasks, use the JQL export method below to capture the full hierarchy.
Epic / Story / Task with Subtasks
Use JQL search to capture the parent and all child items in a single XML export.
When your item has subtasks or child tasks (e.g., an Epic with Stories, or a Story with Sub-tasks), use the JQL search export to capture everything in one file.
JQL Query Examples
For a Task with subtasks — replace TASK-123 with your task key:
Task with subtasksJQL
key = TASK-123 OR parent = TASK-123
For an Epic and its stories — replace EPIC-123 with your epic key:
Epic with storiesJQL
key = EPIC-123 OR parent = EPIC-123
Nested subtasks
The parent = clause captures direct children only. If stories have their own subtasks, add a second level: key = EPIC-123 OR parent = EPIC-123 OR “Epic Link” = EPIC-123
Step-by-Step Export
1
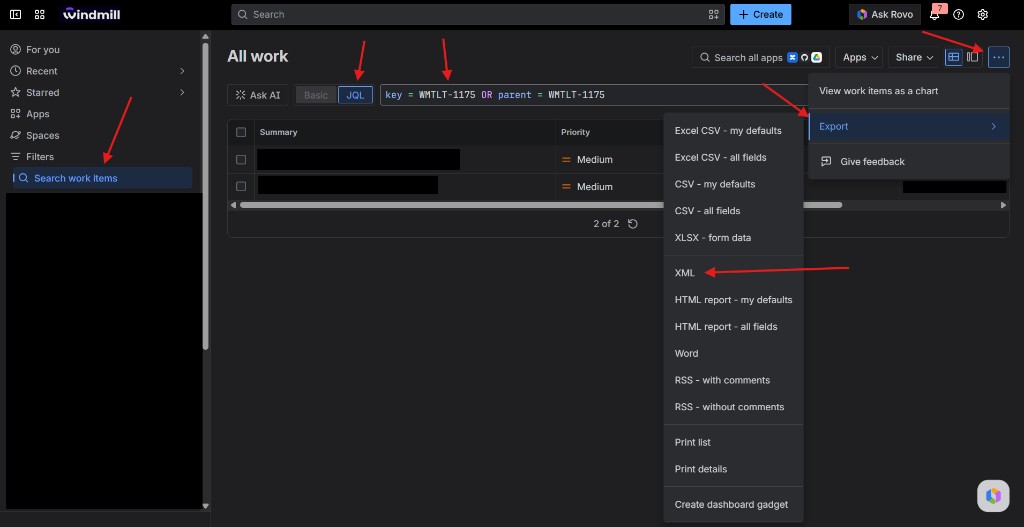
Open "Search work items" in the Jira sidebar.
Look for the magnifying glass / search icon in the left navigation.
2
Switch to JQL mode by clicking the "JQL" button in the search bar.
3
Paste your JQL query into the search field.
Use one of the queries from the examples above.
4
Run the search by pressing Enter or clicking the search button.
5
Click the Share / Export button (⋯) in the top-right corner of the results page.
6
Select "Export" → "XML" from the dropdown menu.
7
Save the downloaded .xml file to your computer.
Phase 2
Importing Tasks into VibeOps
VibeOps has a built-in XML import flow that reads Jira exports directly. Before importing, make sure the target board has all the necessary columns set up.
Preparing the Board
Ensure all required columns exist on the target board before importing.
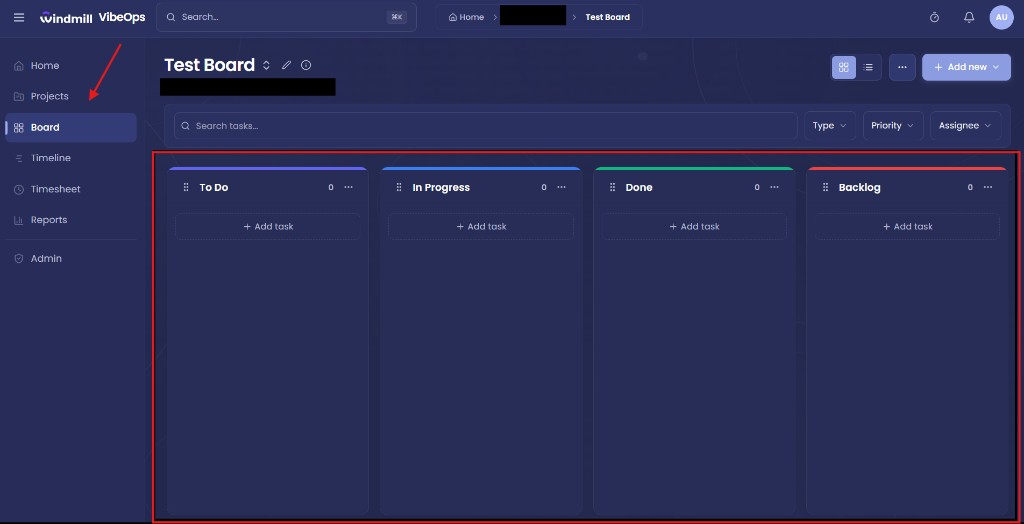
Open the target board in VibeOps (via the left sidebar → Board).
Review the existing columns on the board.
Common columns: Backlog, To Do, In Progress, In Review, Done.
Add any missing columns before running the import.
Click "+ Add task" at the bottom of any column or use the "Add New → Column" button in the top-right.
Column mismatch
Tasks imported with a status that doesn't match any board column will be placed in the default target column you select during import. Set up columns first to preserve original statuses.
Import Flow
The import wizard walks you through selecting the source file, mapping statuses, previewing results, and confirming the import.
Opening the Import Modal
1
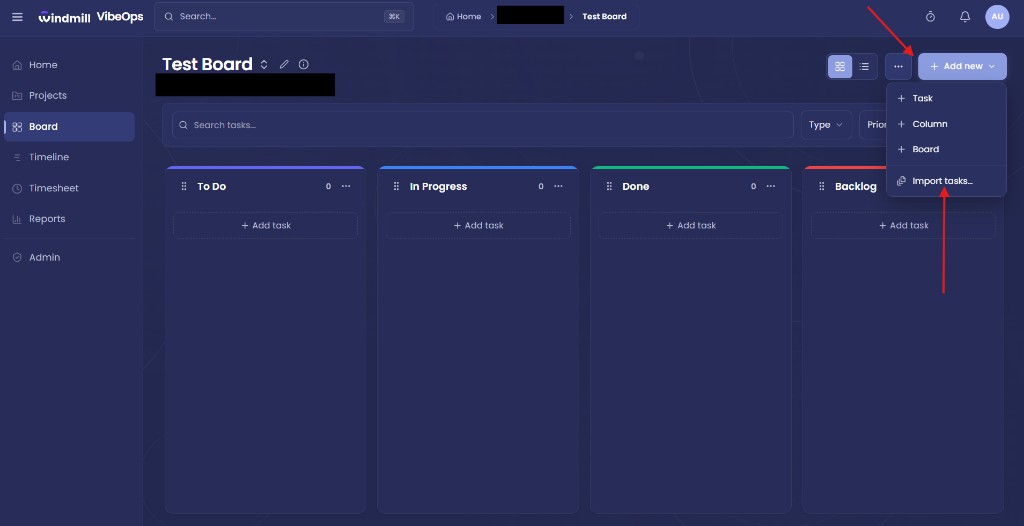
Click the "+ Add New" button in the top-right corner of the board view.
This button is visible when you are on any board.
2
Select "Import tasks..." from the dropdown menu.
Configuring the Import
1
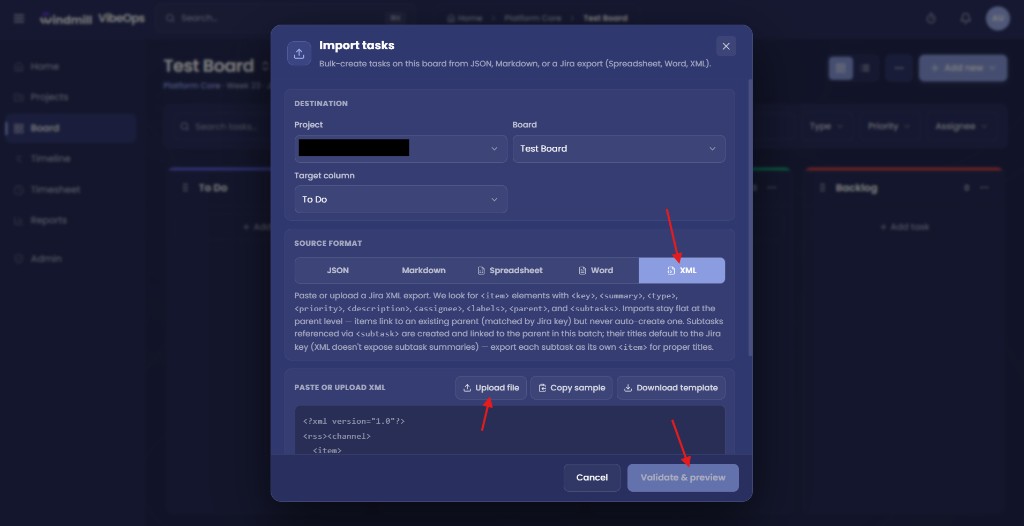
In the "Destination" section, confirm the correct Project and Board are selected.
These default to the board you were viewing when you opened the modal.
2
Set the "Target column" — this is where tasks will land if their status cannot be auto-mapped.
3
In "Source Format", select the XML tab.
VibeOps also supports JSON, Markdown, Spreadsheet, and Word formats.
4
Upload your exported XML file using the "Upload file" button.
Alternatively, paste the XML content directly into the text area.
Validate & Submit
1
Click "Validate & Preview" to parse the XML and preview all detected tasks.
VibeOps will show a summary of items found, including parent/subtask relationships.
2
Review the preview list — check that task titles, types, and assignees look correct.
3
If the preview looks good, click "Import X tasks" to complete the import.
Import complete
Once submitted, tasks will appear on your board immediately. Parent–child relationships are preserved: subtasks appear linked under their parent item.
Tips & Troubleshooting
XML file is too large
Jira XML exports can be large for big epics. Split the JQL query into smaller batches (e.g., by sprint or date range) and import each batch separately.
Assignees not auto-matched
VibeOps tries to match Jira usernames to workspace members by name and email. If a match fails, tasks are imported unassigned and you can bulk-reassign them after.
Subtask titles are missing
Jira XML does not include subtask summaries in the parent item — it only stores their keys. Export each subtask as its own item using the JQL method to get full titles.
Status mapping
Common Jira statuses ("To Do", "In Progress", "Done", "Backlog") are auto-mapped. Custom statuses fall back to the default target column you specified.
Need help with a specific migration?
If your Jira project has a complex structure (multiple levels, custom fields, or large volumes), reach out to your workspace admin or contact support.